
Filed under: Art and Design at University, Art Progress | Tags: art and design, Art progress, Artwork, dry point printing, intaglio printing, printing, printing process, wolverhampton university
I thought I would share my first experiences trying out dry point printing at University. When etching my first design on plastic (below) of me and my partner Jamie, I didn’t think that the results would turn out as well as they did. I loved the whole process of dry point printing – I found it a lot easier than screen printing and lino printing, but the results were great. I can’t wait to experiment more.

First four prints I did
Above, I first printed the ones that don’t have much shading, as it was my first attempt I didn’t know where to apply most of the ink, but then gradually added a bit more to make the print more effective (below.)
For the process, I wet the paper (so the print can be made) and rubbed oil based ink into the etch on plastic. I then rubbed away the excess ink and added shading with it where needed. I then placed the etching board down and put the damp paper on top. I then put them through the rolling machine, and taped down to dry.

Close up of print.

Butterfly prints
I enjoyed the process so much I decided to do another one. Above is an etch from a photograph I took of a butterfly. I used the same process as above but this time experimented with tissue paper to add colour. As you can see, the print on the right did not turn out as well as I’d have liked, because the tissue paper moved in the printing process.
I will be doing lots more dry point printing next week, and can’t wait to show everyone the results. I am really looking forward to experimenting more with this way of printing, and hopefully putting some in my shop!
Filed under: Art Progress, Artwork for Sale | Tags: art, art for sale, Art progress, blogging, etsy, fairies, fantasy, flowers, mixed media, Original, unique, Whimsical
Hi all!
Recently I have been doing lots of art but unfortunately haven’t been using my blog. This is about to change! I am so glad to be getting back into my art and I am looking forward to posting regular blog posts on my new ideas/illustrations and artworks!
Here’s a couple of pieces I have been working on the last couple of months:

magical midnight meeting, painted on a large thin canvas

fairy floral bliss, painted on an upcycled wooden wall hanging
There are plenty more that you can see, which are available to purchase in my etsy store here.
Filed under: Art Progress | Tags: Art progress, certificate of authenticity, copyright art, design, for sold artwork, original artwork and designs, whimsical art
I now have a Certificate of Authenticity for my Artwork. I got this idea from ArtGallery.co.uk and thought it would be great for the people who buy my artwork to have something to confirm its originality. Here it is:

So now whenever I sell a piece of artwork or a creation, this will be included!
Filed under: Art Progress, Artwork for Sale, Doodles and Illustrations | Tags: Art progress, heart, i'll eat your heart, lizard mouth, love hearts, mixed media, monster, original artwork, paper and card, spooky, textured paper painting, woman

Found this painting I did a couple of months ago today while I was sorting out my art stuff. I’ve named it ‘I’ll eat your heart.’ I’ll be putting it up for sale on my Etsy soon, and I might do a similar bigger version when my art flare comes back!
Filed under: Art of the Week | Tags: art of the week, Art progress, button art work, first piece i sold, inspiration, march 2011, pastel colours, sold, tree of happiness

For this weeks ‘Art of the Week’ I decided to chose the first real piece of Artwork I ever sold. This means, a piece of Artwork that I sold to a total stranger! I sold this piece of artwork the beginning of March 2011 on ArtGallery.co.uk. I was over the moon that someone wanted to put a piece of my original work on their wall, and it boosted my confidence so much I decided to make my facebook page of Cally’s Creations. You could say it is thanks to selling this piece that I am where I am today.
Cally’s Creations has now been up and running for a year. Although I still have a long way to go with building my Art business, I am proud of how much I have achieved in such a small space of time. This piece of artwork ~ Tree of Happiness, will always remind me of this!
It was before I started texturing canvases. I have layered on pastel colours of acrylic and emulsion and glitter, painted a silhouette of a tree and decorated it with buttons.
I am hoping to do some similar pieces for my Etsy shop real soon!
Filed under: Art Progress | Tags: Art progress, colourful, creative people are not meant to be tidy, creativity, mixed media, paper flowers, spring, typography, words
A recent conversation inspired me to create this mixed media piece on 30x40cm canvas. I have ripped up paper and card and textured in layers on the canvas. I then printed off some words ‘Creative people are not meant to be tidy!’ and pasted them onto the canvas, too.

I then added some of my paper flowers to make the mixed media more 3D and alive! Then I started painting!

I enhanced the words and flowers with black acrylic to give the painting more detail!

This piece of artwork will be available for sale in the next couple of days on my Etsy shop! Don’t forget, you can buy directly off me, just go onto my facebook page and message me!
Filed under: Art Progress | Tags: 3d paper flowers, Art progress, arts and crafts, Artwork, card, greetings card toppers, ideas, mothers day, paper, paper crafts, Shakespeare's Macbeth, split pins
Last night I made all of these Paper Flowers… I must admit they are addictive to make and I will be using this technique on many creations in the future!

To make these 3D paper flowers I cut various sized circles out of different cards and papers and scrunch them up so they look ruffled. The paper I have used musical note paper, textured paper, colourful card and pages from Shakespeare’s Macbeth, but you could use any paper/card you wish!

After scrunching them up, I place all the ruffled circles together, and make a hole in the middle either with a crafting knife or a pair of scissors. I then use split pins (which you can buy at any stationary shop) to push through the middle and hold them together!
Simple but effective way of making beautiful flowers for your creations. I will be using these on many things such as canvas paintings, cards and making them into magnets!
Filed under: Art Progress | Tags: Art progress, Artwork, etsy shop, mixed media, mother and daughter paintings, mothers day, original artwork, paper flowers, spring is coming, textured canvases and canvas boards
We didn’t get up until after 12pm today! My aim was to clean the house, put the dinner on by 12 so I could spend all day in the art room painting… but plans never go as they’re meant to in this house! I skipped the housework (and the dinner prep… !) and started painting instead.

Painting in progress
I textured this canvas last night and started painting today. It is a painting of a Mother and her daughter. The daughter is wearing a patchwork dress and holding some balloons, and lovely flowers for her mom for Mother’s Day (see below.) I have since gone over the flowers in black and signed it, so all I need to do now is varnish it and it’s done!

Nearly finished!
I have also been working on these paper flower mixed media paintings. I have textured the 5×7 inch canvas boards with ripped paper and card, and made a flower paper using layers of musical note paper, Shakespearean paper and lined paper and attached them together, then painted on them and stuck them to the board. I hope to also make some magnets and greetings cards like these!

Mixed media canvas board paintings, paper flowers.
These will be available in my Etsy shop tomorrow!
Filed under: Music Posts, Other Posts | Tags: Art progress, canvas board textured, cats, home, jayme russon music, life, mothers day paintings, new band, silent light, unsigned band, what i've been up to today
Good evening, everyone!
I don’t usually like to do blog posts if I haven’t got something visual to contribute…. but today we didn’t get back from visiting family in Birmingham until after 6, so it was too late to photograph any of my art progress, and I was quite tired and cold, too!
So, after we got in, I tended to the cats with food and hugs and kisses… then started texturing some canvases and smaller canvas boards. I have in progress two mother and daughter paintings approximately 9×11 inches, and a couple of 8×8 inch and 5×7 inch canvas boards (which I’m not sure what I’m doing with yet.) The mother and daughter paintings will hopefully be finished tomorrow so I can get them out ready for mothers day.
The reason I have slacked so much the last couple of days is because I have been helping my boyfriend come up with his new band name. He left his old band about 3 months ago as he just couldn’t get along with them, and has now formed a new and improved one! His song writing has gone through the roof and (I know I’m biased) I am sure they are bound to get the crowds going once they start gigging.
Anyway, after 3 long months of trying to come up with a new band name, they have finally settled on ‘Silent Lights.’ It’s amazing that they have come to an agreement with a name, as every time a suitable name came along we realised another band had already snapped it up! I am so happy that they’ve came up with something, so now we can officially get the ball rolling! I enjoy helping Jamie with his band as much as I love working on my artwork (well not as much, but nearly!) and they will hopefully be getting into the studio within the next month and having a photo shoot at the end of the month.
Although they haven’t yet got any music up yet, they will do soon, so if you would like to become a fan of theirs on facebook just click the link at the left, or above, or here.
Jamie does have a myspace that he uploads his own recordings too, nothing too snazzy but just rough structures to his amazing songs. If you would like to check them out, click here!
I will definitely be having some art-related blog posts up tomorrow, but until then, good night!
Cally xo
Filed under: Art Progress | Tags: Art progress, bookmark, etsy, first etsy sales, hand painted, postcards, promotion, social media, whimsical original artwork
Today I made my first two sales on Etsy! I was so happy. I have been on Etsy since January 2011 but never really got the hang of promoting my shop and using social media to gain views and potential sales. For just two weeks now I have been trying my very hardest to change this, listed many more of my creations and after making two sales today I am pretty sure I am one step closer to promoting correctly!
These are the items I sold:

Teal Cat Bookmark – hand painted and hand made with textured card and decorative ribbon
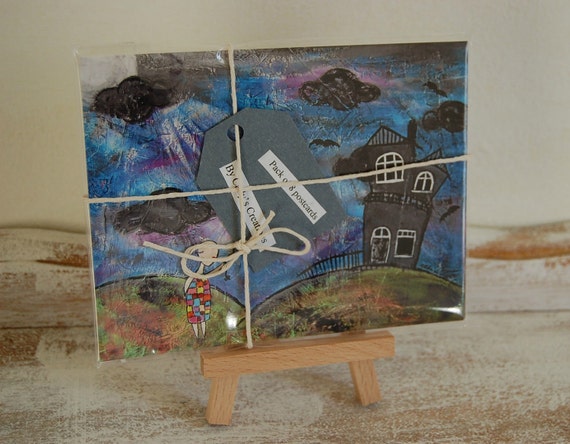
Pack of 8 original Cally’s Creations mixed media postcards
I hope this is the beginning of many sales to come!
